参考视频:
简单用法
GET/POST请求
使用http.Get()和http.Post()可以发起简单的请求,返回一个指针和错误,调用后需要手动关闭
GET:
1
2
3
4
5
6
7
8
9
10
func main() {
  resp, err := http.Get("https://baidu.com")
  if err != nil {
    fmt.Println(err)
    return
  }
  defer resp.Body.Close()
  content, err := io.ReadAll(resp.Body)
  fmt.Println(string(content))
}
POST:
1
2
3
4
5
6
7
8
9
10
11
12
13
14
15
16
17
func main() {
   person := Person{
      UserId:   "120",
      Username: "jack",
      Age:      18,
      Address:  "usa",
   }

   json, _ := json.Marshal(person)
   reader := bytes.NewReader(json)

   resp, err := http.Post("https://golang.org", "application/json;charset=utf-8", reader)
   if err != nil {
      fmt.Println(err)
   }
   defer resp.Body.Close()
}
配置客户端
若需要客户端携带Head,设置超时等,就需要自己配置一个客户端,会用到http.Client{}结构体,配置项如下:
Transport:配置 Http 客户端数据传输相关的配置项,没有就采用默认的策略Timeout:请求超时时间配置Jar:Cookie 相关配置CheckRedirect:重定向配置1
2
3
4
5
6
7
8
9
10
11
12
13
14
15client := &http.Client{ Timeout: 30 * time.Second, Transport: &http.Transport{ MaxIdleConns: 10, IdleConnTimeout: 90 * time.Second, DisableCompression: true, }, CheckRedirect: func(req *http.Request, via []*http.Request) error { if len(via) >= 10 { return errors.New("too many redirects") } return nil }, Jar: cookieJar, // 可以自动管理 cookie }
并通过
client.Do()发送请求,通过.Header.Add()添加请求头
1
2
3
4
5
6
7
func main() {
client := &http.Client{}
request, _ := http.NewRequest("GET", "https://golang.org", nil)
request.Header.Add("Authorization","123456")
resp, _ := client.Do(request)
defer resp.Body.Close()
}处理相应的时候要注意:
- 处理完后关闭
resp.Body - 检查
resp.StatusCode,HTTP状态码这些不会作为error返回
1
2
3
4
if resp.StatusCode != http.StatusOK {
return fmt.Errorf("bad status: %s", resp.Status)
}
body, err := io.ReadAll(resp.Body)配置服务端
http.HandleFunc()用于注册路由,第一个参数是接口,第二个参数可以将一个普通函数作为HTTP处理器使用,该函数携带一个http.ResponseWriter来写响应,*http.Request为请求http.ListenAndServe()可以直接泡一个服务器,第一个参数是监听的地址,可以只写端口,前面默认localhost;第二个参数是处理器,若为nil则使用默认的处理器
1
2
3
4
http.HandleFunc("/ping", func(w http.ResponseWriter, r *http.Request) {
w.Write([]byte("pong"))
})
http.ListenAndServe(":8080", nil)以下方法用于获取请求信息:
1
2
3
4
5
6
7
8
9
10
11
12
13
func handler(w http.ResponseWriter, r *http.Request) {
// 方法
method := r.Method
// URL 参数 /user?id=1
id := r.URL.Query().Get("id")
// 路径参数(需配合路由库,标准库只支持前缀匹配)
path := r.URL.Path
// 请求头
auth := r.Header.Get("Authorization")
// Body
body, _ := io.ReadAll(r.Body)
defer r.Body.Close()
}同时可以自定义server端结构
1
2
3
4
5
6
7
8
9
10
11
12
13
14
15
16
17
18
19
20
srv := &http.Server{
Addr: ":8080",
Handler: mux,
ReadTimeout: 5 * time.Second,
WriteTimeout: 10 * time.Second,
IdleTimeout: 120 * time.Second,
}
go func() {
if err := srv.ListenAndServe(); err != nil {
log.Fatal(err)
}
}()
// 优雅关闭
quit := make(chan os.Signal, 1)
signal.Notify(quit, syscall.SIGINT, syscall.SIGTERM)
<-quit
ctx, cancel := context.WithTimeout(context.Background(), 5*time.Second)
defer cancel()
srv.Shutdown(ctx)通过Header可以设置返回的响应的格式
纯文本:
1
2w.Header().Set("Content-Type", "text/plain") w.Write([]byte("OK"))JSON:
1
2
3
4
5
6
7type User struct { Name string `json:"name"` Age int `json:"age"` } data := User{Name: "John", Age: 30} w.Header().Set("Content-Type", "application/json") json.NewEncoder(w).Encode(data) // 或者 json.Marshal + w.Write
在Write前可用WriteHeader()设置状态码,若不调用WriteHeader默认返回200 OK
go中自带了常用状态码的常量名
1
2
w.WriteHeader(http.StatusCreated) // 必须在 Write 之前调用
w.Write([]byte("created"))例
简单创建一个服务端,注册路由:
1
2
3
4
5
6
7
8
9
10
11
12
13
14
package main
import (
"fmt"
"net/http"
)
func main() {
http.HandleFunc("/ping", func(w http.ResponseWriter, r *http.Request){
fmt.Println("Req: ping")
w.Write([]byte("pone"))
})
http.ListenAndServe(":8080", nil)
}客户端写一个单测,向服务端发送一个post请求,得到服务端返回的pone以及error
1
2
3
4
5
6
7
8
9
10
11
12
13
14
15
16
17
18
19
20
package client
import (
"io"
"net/http"
"testing"
)
func Test_client(t *testing.T) {
resp, err := http.Post("http://localhost:8080/ping", "", nil)
if err != nil {
t.Error(err)
return
}
body, _ :=io.ReadAll(resp.Body)
defer resp.Body.Close()
t.Log(string(body))
t.Error("test failed")
}服务端
Server
整个HTTP服务端模块被封装在Server类中,包括两个核心字段:
Addr string:服务端的地址Handler Handler:路由处理器它的类型是一个Handler接口,其中定义了一个方法
ServeHTTP,用于根据Http请求中的请求路径映射到对应的handler处理函数,对请求处理和响应
路由处理器用于处理客户端请求,根据请求参数中的路径映射到对应的处理方法,再调用对应方法并返回结果
ServerMux
对Handler的具体实现,内部维护了一个map用于映射从path到对应处理方法的关系
1
2
3
4
5
6
type serveMux121 struct {
mu sync.RWMutex
m map[string]muxEntry
es []muxEntry // slice of entries sorted from longest to shortest.
hosts bool // whether any patterns contain hostnames
}- 通过一把读写锁保证并发安全性
- 使用map建立映射,以请求路径为key,对应处理函数作为value
- es是一个切片,用于前置匹配
其中muxEntry是一个handler单元,包含了path和处理函数handler两部分,它冗余了一个path,将key和value都保存了下来,同样使用了Handler接口,也需要请求和响应的使用
1
2
3
4
type muxEntry struct {
h Handler
pattern string
}Handler注册流程
方法链:http.handleFunc()作为入口方法调用,进而会调用ServerMux.handleFunc()和ServerMux.Handle()
http包下声明了一个单例var defaultServeMux ServeMux,当使用http.handleFunc()注册handler时,会使用该默认单例注册
1
2
3
4
5
6
func (mux *serveMux121) handleFunc(pattern string, handler func(ResponseWriter, *Request)) {
if handler == nil {
panic("http: nil handler")
}
mux.handle(pattern, HandlerFunc(handler))
}HandleFunc函数接受路径和处理函数两个变量,并调用默认单例下的HandleFunc函数,该函数会将我们的处理函数handler转化为一个HandlerFunc类型,这个类型内部实现了Handler接口中需要的ServeHTTP方法,即调用函数自身,转换后会调用自己的mux.Handle()方法
接下来是Handle方法
1
2
3
4
5
6
7
8
9
10
11
12
13
14
15
func (mux *serveMux121) handle(pattern string, handler Handler) {
mux.mu.Lock()
defer mux.mu.Unlock()
// ...
e := muxEntry{h: handler, pattern: pattern}
mux.m[pattern] = e
if pattern[len(pattern)-1] == '/' {
mux.es = appendSorted(mux.es, e)
}
if pattern[0] != '/' {
mux.hosts = true
}
}- 通过读写锁保证并发安全性
- handle函数将路径和处理函数组成一个键值对放入serveMux的map中
- 若传入的请求路径以
/结尾,HTTP服务端就会把它视作前置匹配的模式,将路径加入es切片中,并按照路径长度降序排列 - 若不以
/开头,说明这个路由模式是主机模式,需要匹配主机头和路径,而若以/开头,说明路由模式是路径模式,可以忽略主机名
服务端运行流程
主流程
流程图如下:
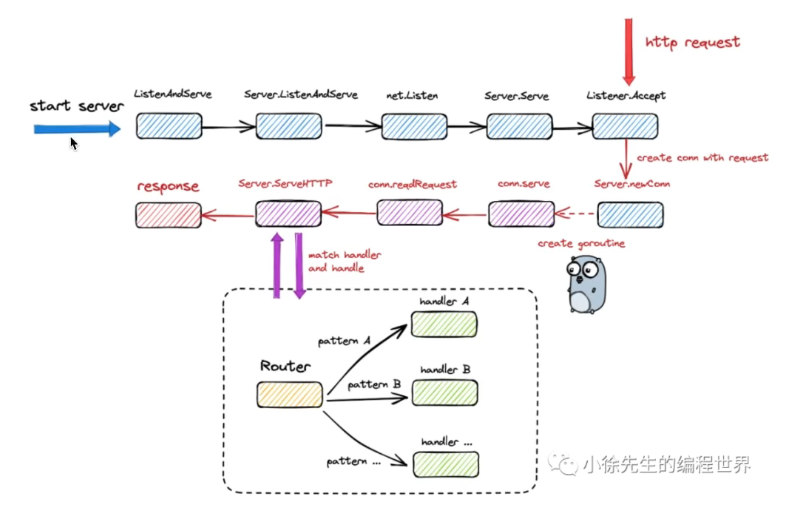
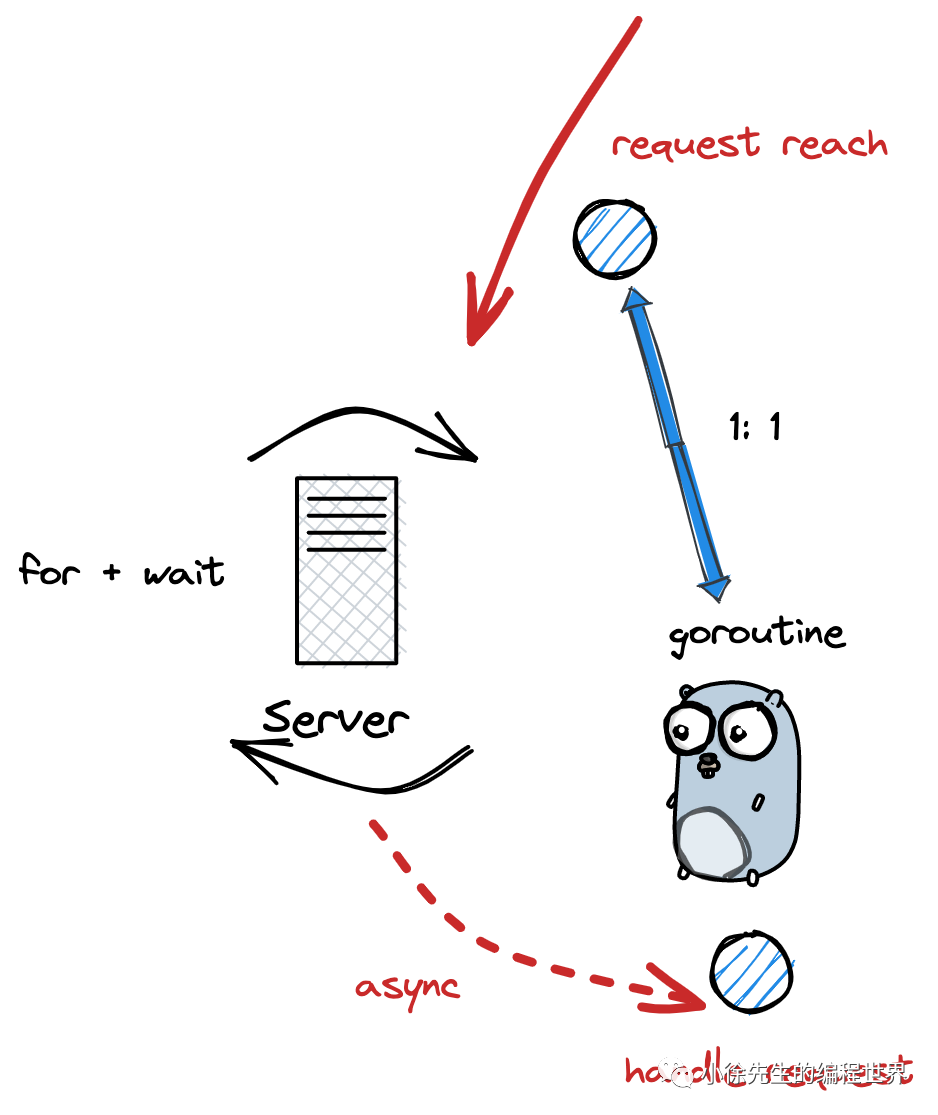
net.Listen()用于为当前端口申请一个监听器- 服务端启动时会以for循环自旋方式运行,每次循环都会调用
Listener.Accept()方法,保证持续监听端口时,若当前没有来自客户端的http请求,则当前服务端对应的goroutine会被动陷入阻塞,可以节省CPU,一旦有请求到来,服务端会被唤醒,执行接下来的流程 - 针对到来的每一个请求都会构造一个connection结构体并启动一个goroutine来负责完成当前请求的处理,主方法继续循环监听
- 接下来封装请求,到
Server.ServeHTTP()方法时,会通过map匹配到对应处理函数处理,并输出响应
1
2
3
4
func ListenAndServe(addr string, handler Handler) error {
server := &Server{Addr: addr, Handler: handler}
return server.ListenAndServe()
}ListenAndServe函数传入地址和handler,若handler为nil,会默认使用之前定义的default单例,传入后声明一个新的Server对象,并嵌套调用内部的方法
1
2
3
4
5
6
7
8
9
10
11
12
13
14
func (s *Server) ListenAndServe() error {
if s.shuttingDown() {
return ErrServerClosed
}
addr := s.Addr
if addr == "" {
addr = ":http"
}
ln, err := net.Listen("tcp", addr)
if err != nil {
return err
}
return s.Serve(ln)
}该方法根据用户传入的端口,调用listen方法针对端口号分配一个端口监听器,并调用Serve方法
serve方法
1
2
3
4
5
6
7
8
9
10
11
12
13
14
15
16
17
18
19
20
21
22
23
24
25
26
27
28
29
30
31
32
33
34
35
36
37
func (s *Server) Serve(l net.Listener) error {
//...
ctx := context.WithValue(baseCtx, ServerContextKey, s)
for {
rw, err := l.Accept()
if err != nil {
if s.shuttingDown() {
return ErrServerClosed
}
if ne, ok := err.(net.Error); ok && ne.Temporary() {
if tempDelay == 0 {
tempDelay = 5 * time.Millisecond
} else {
tempDelay *= 2
}
if max := 1 * time.Second; tempDelay > max {
tempDelay = max
}
s.logf("http: Accept error: %v; retrying in %v", err, tempDelay)
time.Sleep(tempDelay)
continue
}
return err
}
connCtx := ctx
if cc := s.ConnContext; cc != nil {
connCtx = cc(connCtx, rw)
if connCtx == nil {
panic("ConnContext returned nil")
}
}
tempDelay = 0
c := s.newConn(rw)
c.setState(c.rwc, StateNew, runHooks) // before Serve can return
go c.serve(connCtx)
}
}可以发现通过for循环轮询,每次调用Accept()方法,当有请求到来时,会通过newConn()封装一个结构体,并为新的请求调用conn.serve()方法调用一个goroutine,主循环继续监听
调用的这个方法是整个逻辑的主要方法,用来读取context中的请求,并传入serverHandler.ServeHTTP()来处理请求
1
2
3
4
5
6
7
8
func (sh serverHandler) ServeHTTP(rw Responsewriter,req *Request){
handler := sh.srv.Handler
if handler ==nil{
handler = DefaultServeMux
}
//..
handler.ServeHTTP(rw,req)
}这里的serverHandler就是我们ListenAndServe时传入的参数,若handler为nil就会指定为default,进而调用路由中的ServeHTTP方法
这个方法有两步:
- 通过request找到对应的handler
- 执行handler的ServeHTTP方法
如何找到对应的handler呢?
1
2
3
4
5
6
7
8
9
10
11
12
13
14
15
16
func (mux *serveMux121) handler(host, path string) (h Handler, pattern string) {
mux.mu.RLock()
defer mux.mu.RUnlock()
// Host-specific pattern takes precedence over generic ones
if mux.hosts {
h, pattern = mux.match(host + path)
}
if h == nil {
h, pattern = mux.match(path)
}
if h == nil {
h, pattern = NotFoundHandler(), ""
}
return
}- 首先对应加一把读锁,防止并发问题
- 根据hosts标记是否为真,选择路由模式,调用match函数
1
2
3
4
5
6
7
8
9
10
11
12
13
14
15
func (mux *serveMux121) match(path string) (h Handler, pattern string) {
// Check for exact match first.
v, ok := mux.m[path]
if ok {
return v.h, v.pattern
}
// Check for longest valid match. mux.es contains all patterns
// that end in / sorted from longest to shortest.
for _, e := range mux.es {
if strings.HasPrefix(path, e.pattern) {
return e.h, e.pattern
}
}
return nil, ""
}- 首先精准匹配,从map例直接找,找到了就返回
- 若匹配不上,就按照最长公共前缀从长到短来匹配,若当前拿到的path是我们传入的请求路径的前缀,就返回该前缀对应的处理函数,响应请求
客户端
Client
client类对整个客户端模块封装
1
2
3
4
5
6
type Client struct {
Transport RoundTripper
CheckRedirect func(req *Request, via []*Request) error
Jar CookieJar
Timeout time.Duration
}Transport:http通信核心部分Jar:Cookie管理Timeout:超时控制
其中Transport的类型是RoundTripper接口,里面定义了方法Roundtrip(),通过传入请求和服务端交互后产生响应Response
而Transport是实现类,核心字段:
1
2
3
4
5
6
type Transport struct {
idleConn map[connectMethodKey][]*persistConn
//...
DialContext func(ctx context.Context, network, addr string) (net.Conn, error)
//...
}idleConn:空闲连接的map,可以实现复用DialContext:新连接生成器,传入协议,目标地址等生成tcp连接
Request结构体用于封装请求数据
1
2
3
4
5
6
7
8
9
10
11
12
13
14
15
16
17
18
19
type Request struct {
// 方法
Method string
// 请求路径
URL *url.URL
// 请求头
Header Header
// 请求参数内容
Body io.ReadCloser
// 服务器主机
Host string
// query 请求参数
Form url. Values
// 响应参数 struct
Response *Response
// 请求链路的上下文
ctx context.Context
// ...
}Response结构体用于封装响应数据
1
2
3
4
5
6
7
8
9
10
11
12
13
type Response struct {
// 请求状态,200 为 请求成功
StatusCode int // e.g. 200
// http 协议,如:HTTP/1.0
Proto string // e.g. "HTTP/1.0"
// 请求头
Header Header
// 响应参数内容
Body io.ReadCloser
// 指向请求参数
Request *Request
// ...
}方法链路
客户端发起一次http请求的步骤:
- 构造http请求参数
- 获取用于与服务端交互的tcp连接
- 通过tcp连接发送请求参数
- 通过tcp连接接受响应结果
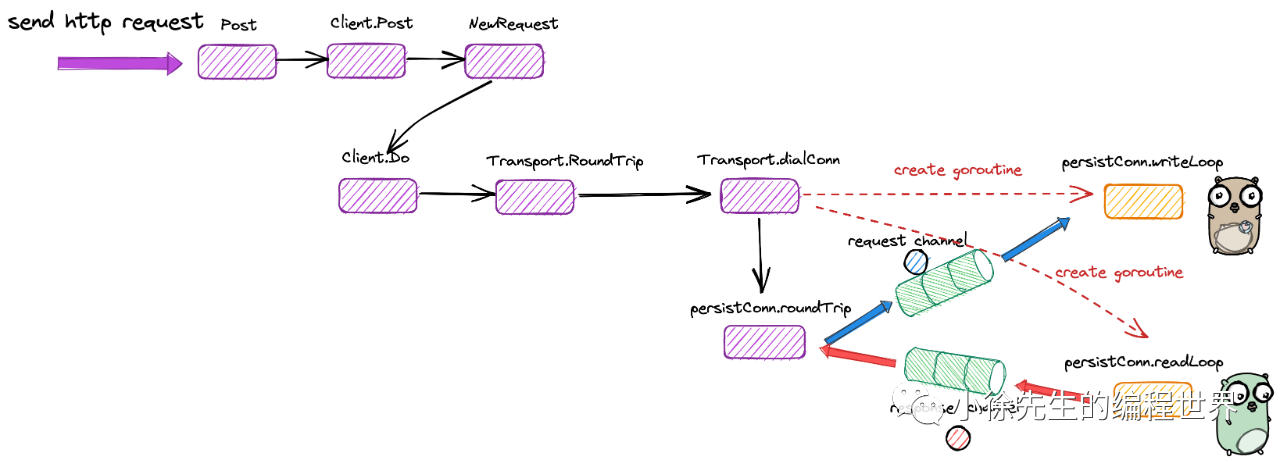
假设调用http.Post()发送一个post请求:
- 首先构造request
- 通过Transport模块的roudetrip构建tcp链接
- 构建的connection分为两个goroutine:
writeLoop和readLoop - 通过往request channel中塞入参数,writeLoop就会和服务端通信
- 服务端返回的响应由
readLoop接收,通过response channel传回接受方
为什么要使用channel和goroutine呢
请求流程
传入请求
http.Post()方法需要传入服务端url,请求参数格式和请求参数的io
reader,它会使用包中的单例客户端DefaultClient处理请求,方法中调用了Defaultclient.Post()方法
1
2
3
4
5
6
7
8
func (c *Client) Post(url, contentType string, body io.Reader) (resp *Response, err error) {
req, err := NewRequest("POST", url, body)
if err != nil {
return nil, err
}
req.Header.Set("Content-Type", contentType)
return c.Do(req)
}将方法,url,请求体通过NewRequest()方法构造出完整的请求参数,设置Header,再传入client.Do()方法处理
获得响应
client.Do()方法通过调用client.send()方法设置cookie,发送请求并更新response的cookie
1
2
3
4
5
6
7
8
9
10
11
12
13
14
15
16
17
18
19
20
21
22
func (c *Client) send(req *Request, deadline time.Time) (resp *Response, didTimeout func() bool, err error) {
cookieURL := req.URL
if req.Host != "" {
cookieURL = cloneURL(cookieURL)
cookieURL.Host = req.Host
}
if c.Jar != nil {
for _, cookie := range c.Jar.Cookies(cookieURL) {
req.AddCookie(cookie)
}
}
resp, didTimeout, err = send(req, c.transport(), deadline)
if err != nil {
return nil, didTimeout, err
}
if c.Jar != nil {
if rc := resp.Cookies(); len(rc) > 0 {
c.Jar.SetCookies(cookieURL, rc)
}
}
return resp, nil, nil
}发送请求使用send函数,传入请求参数和通信模块,默认transport类
1
2
3
4
5
6
func send(ireq *Request, rt RoundTripper, deadline time.Time) (resp *Response, didTimeout func() bool, err error) {
// ...
resp, err = rt.RoundTrip(req)
// ...
return resp, nil, nil
}send函数使用RoundTrip方法
1
2
3
4
5
6
7
8
9
10
func (t *Transport) roundTrip(req *Request) (_ *Response, err error) {
// ...
for {
treq := &transportRequest{Request: req, trace: trace, ctx: ctx, cancel: cancel}
// ...
pconn, err := t.getConn(treq, cm)
// ...
resp, err = pconn.roundTrip(treq)
}
}- 该方法首先将传入参数格式转换为transport格式
- 接下来从transport模块获取一个可用的tcp链接,再用该链接的roundTrip方法获得响应
获取tcp链接
1
2
3
4
5
6
7
8
9
10
11
12
13
14
15
16
17
18
19
20
21
22
23
24
25
26
27
28
29
30
31
32
func (t *Transport) getConn(treq *transportRequest, cm connectMethod) (pc *persistConn, err error) {
// 获取连接的请求参数体
w := &wantConn{
cm: cm,
// key 由 http 协议、服务端地址等信息组成
key: cm.key(),
ctx: ctx,
// 标识连接构造成功的信号发射器
ready: make(chan struct{}, 1),
}
// 倘若连接获取失败,在 wantConn.cancel 方法中,会尝试将 tcp 连接放回队列中以供后续复用
defer func() {
if err != nil {
w.cancel(t, err)
}
}()
// 尝试复用指向相同服务端地址的空闲连接
if delivered := t.queueForIdleConn(w); delivered {
pc := w.pc
// ...
return pc, nil
}
// 异步构造新的连接
t.queueForDial(w)
select {
// 通过阻塞等待信号的方式,等待连接获取完成
case <-w.ready:
// ...
return w.pc, w.err
// ...
}
}通过传入的HTTP协议等信息构建一个key,去之前构建的idle池中映射,尝试复用指向相同服务端地址的空闲链接,若可以则直接返回
若无法复用,就直接异步构造新的连接,主程序暂时阻塞,等待连接构造完毕后返回
使用
queueForIdleConn()尝试复用连接1
2
3
4
5
6
7
8
9
10
11
12
13
14
15
16
17
18
19
20
21
22func (t *Transport) queueForIdleConn(w *wantConn) (delivered bool) { // ... if list, ok := t.idleConn[w.key]; ok { // ... for len(list) > 0 && !stop { pconn := list[len(list)-1] // ... delivered = w.tryDeliver(pconn, nil) if delivered { // ... list = list[:len(list)-1] } stop = true } // ... if stop { return delivered } } // ... return false }从对应的key找符合的连接,若能符合的连接大约等于一个,就找最后一个返回,若没有就只能创造新的连接
1
2
3
4
5
6
7
8
9
10
11
12func (t *Transport) queueForDial(w *wantConn) { // ... go t.dialConnFor(w) // ... } func (t *Transport) dialConnFor(w *wantConn) { // ... pc, err := t.dialConn(w.ctx, w.cm) delivered := w.tryDeliver(pc, err) // ... }queueForDial会异步调用dialConnFor函数,创建新的tcp连接
因为tcp连接是有生命周期的,所以我们需要创建两个读写的守护进程
- dialConn用于创建tcp连接
- tryDeliver用于将连接绑定到wantConn上
- 最后通过关闭ready channel操作唤醒上游读channel的goroutine
1
2
3
4
5
6
7
8
9
10
11
12
13
14
15
func (t *Transport) dialConn(ctx context.Context, cm connectMethod) (pconn *persistConn, err error) {
pconn = &persistConn{
t: t,
reqch: make(chan requestAndChan, 1),
writech: make(chan writeRequest, 1),
// ...
}
conn, err := t.dial(ctx, "tcp", cm.addr())
// ...
pconn.conn = conn
// ...
go pconn.readLoop()
go pconn.writeLoop()
return pconn, nil
}writech由writeLoop持有,readch同理,当客户端想要发送请求后,使用writeLoop写入服务端,使用reqch接收来自服务端的信息到channel
1
2
3
4
5
6
7
8
9
10
11
12
13
14
15
16
17
18
19
20
21
22
23
24
25
26
27
28
func (pc *persistConn) readLoop() {
// ...
alive := true
for alive {
// ...
rc := <-pc.reqch
// ...
var resp *Response
// ...
resp, err = pc.readResponse(rc, trace)
// ...
select{
rc.ch <- responseAndError{res: resp}:
// ...
}
// ...
}
}
func (pc *persistConn) writeLoop() {
for {
select {
case wr := <-pc.writech:
// ...
err := wr.req.Request.write(pc.bw, pc.isProxy, wr.req.extra, pc.waitForContinue(wr.continueCh))
// ...
}
}- readLoop接收到reqch后判断发生新一轮请求,和服务端建立通讯并读取响应,通过内置的channel接收来自服务的响应
- writeLoop拿到客户端提交的请求后,将其发送到服务端
主干链路
1
2
3
4
5
6
7
8
9
10
11
12
13
14
15
16
17
18
19
20
21
func (pc *persistConn) roundTrip(req *transportRequest) (resp *Response, err error) {
    // ...
    pc.writech <- writeRequest{req, writeErrCh, continueCh}
    resc := make(chan responseAndError)
    pc.reqch <- requestAndChan{
        req:        req.Request,
        cancelKey:  req.cancelKey,
        ch:         resc,
        // ...
    }
    // ...
    for {
        select {
        // ...
        case re := <-resc:
            // ...
            return re.res, nil
        // ...
        }
    }
}- 该函数是和两个Loop通讯的主要函数
- 将我们的请求塞入writech,使得writeLoop接收,并把请求放入服务端,并构造好接收响应的channel,塞入requestAndChan中,这样就可以被readLoop接收到
- 后续使用for循环持续监听,当readLoop接收到了结果,就会被主流程接收到,进行处理