【Golang】Http标准库

  • ~16.40K 字
  1. 1. 简单用法
    1. 1.1. GET/POST请求
    2. 1.2. 配置客户端
    3. 1.3. 配置服务端
    4. 1.4. 例
  2. 2. 服务端
    1. 2.1. Server
    2. 2.2. ServerMux
    3. 2.3. Handler注册流程
    4. 2.4. 服务端运行流程
      1. 2.4.1. 主流程
      2. 2.4.2. serve方法
  3. 3. 客户端
    1. 3.1. Client
    2. 3.2. 方法链路
    3. 3.3. 请求流程
      1. 3.3.1. 传入请求
      2. 3.3.2. 获得响应
      3. 3.3.3. 获取tcp链接
      4. 3.3.4. 主干链路

参考视频:

【Golang http 标准库底层原理解析】

简单用法

GET/POST请求

使用http.Get()和http.Post()可以发起简单的请求,返回一个指针和错误,调用后需要手动关闭

GET:

1
2
3
4
5
6
7
8
9
10
func main() {
resp, err := http.Get("https://baidu.com")
if err != nil {
fmt.Println(err)
return
}
defer resp.Body.Close()
content, err := io.ReadAll(resp.Body)
fmt.Println(string(content))
}

POST:

1
2
3
4
5
6
7
8
9
10
11
12
13
14
15
16
17
func main() {
person := Person{
UserId: "120",
Username: "jack",
Age: 18,
Address: "usa",
}

json, _ := json.Marshal(person)
reader := bytes.NewReader(json)

resp, err := http.Post("https://golang.org", "application/json;charset=utf-8", reader)
if err != nil {
fmt.Println(err)
}
defer resp.Body.Close()
}

配置客户端

若需要客户端携带Head,设置超时等,就需要自己配置一个客户端,会用到http.Client{}结构体,配置项如下:

  • Transport:配置 Http 客户端数据传输相关的配置项,没有就采用默认的策略

  • Timeout:请求超时时间配置

  • Jar:Cookie 相关配置

  • CheckRedirect:重定向配置

    1
    2
    3
    4
    5
    6
    7
    8
    9
    10
    11
    12
    13
    14
    15
    client := &http.Client{
    Timeout: 30 * time.Second,
    Transport: &http.Transport{
    MaxIdleConns: 10,
    IdleConnTimeout: 90 * time.Second,
    DisableCompression: true,
    },
    CheckRedirect: func(req *http.Request, via []*http.Request) error {
    if len(via) >= 10 {
    return errors.New("too many redirects")
    }
    return nil
    },
    Jar: cookieJar, // 可以自动管理 cookie
    }

并通过 client.Do()发送请求,通过.Header.Add()添加请求头

1
2
3
4
5
6
7
func main() {
client := &http.Client{}
request, _ := http.NewRequest("GET", "https://golang.org", nil)
request.Header.Add("Authorization","123456")
resp, _ := client.Do(request)
defer resp.Body.Close()
}

处理相应的时候要注意:

  • 处理完后关闭resp.Body
  • 检查resp.StatusCode,HTTP状态码这些不会作为error返回
1
2
3
4
5
if resp.StatusCode != http.StatusOK {
return fmt.Errorf("bad status: %s", resp.Status)
}
body, err := io.ReadAll(resp.Body)

配置服务端

  • http.HandleFunc()用于注册路由,第一个参数是接口,第二个参数可以将一个普通函数作为HTTP处理器使用,该函数携带一个http.ResponseWriter来写响应,*http.Request为请求
  • http.ListenAndServe()可以直接泡一个服务器,第一个参数是监听的地址,可以只写端口,前面默认localhost;第二个参数是处理器,若为nil则使用默认的处理器
1
2
3
4
5
http.HandleFunc("/ping", func(w http.ResponseWriter, r *http.Request) {
w.Write([]byte("pong"))
})
http.ListenAndServe(":8080", nil)

以下方法用于获取请求信息:

1
2
3
4
5
6
7
8
9
10
11
12
13
func handler(w http.ResponseWriter, r *http.Request) {
// 方法
method := r.Method
// URL 参数 /user?id=1
id := r.URL.Query().Get("id")
// 路径参数(需配合路由库,标准库只支持前缀匹配)
path := r.URL.Path
// 请求头
auth := r.Header.Get("Authorization")
// Body
body, _ := io.ReadAll(r.Body)
defer r.Body.Close()
}

同时可以自定义server端结构

1
2
3
4
5
6
7
8
9
10
11
12
13
14
15
16
17
18
19
20
21
srv := &http.Server{
Addr: ":8080",
Handler: mux,
ReadTimeout: 5 * time.Second,
WriteTimeout: 10 * time.Second,
IdleTimeout: 120 * time.Second,
}
go func() {
if err := srv.ListenAndServe(); err != nil {
log.Fatal(err)
}
}()

// 优雅关闭
quit := make(chan os.Signal, 1)
signal.Notify(quit, syscall.SIGINT, syscall.SIGTERM)
<-quit
ctx, cancel := context.WithTimeout(context.Background(), 5*time.Second)
defer cancel()
srv.Shutdown(ctx)

通过Header可以设置返回的响应的格式

  • 纯文本:

    1
    2
    w.Header().Set("Content-Type", "text/plain")
    w.Write([]byte("OK"))
  • JSON:

    1
    2
    3
    4
    5
    6
    7
    type User struct {
    Name string `json:"name"`
    Age int `json:"age"`
    }
    data := User{Name: "John", Age: 30}
    w.Header().Set("Content-Type", "application/json")
    json.NewEncoder(w).Encode(data) // 或者 json.Marshal + w.Write

在Write前可用WriteHeader()设置状态码,若不调用WriteHeader默认返回200 OK

go中自带了常用状态码的常量名

1
2
w.WriteHeader(http.StatusCreated) // 必须在 Write 之前调用
w.Write([]byte("created"))

例

简单创建一个服务端,注册路由:

1
2
3
4
5
6
7
8
9
10
11
12
13
14
package main

import (
"fmt"
"net/http"
)

func main() {
http.HandleFunc("/ping", func(w http.ResponseWriter, r *http.Request){
fmt.Println("Req: ping")
w.Write([]byte("pone"))
})
http.ListenAndServe(":8080", nil)
}

客户端写一个单测,向服务端发送一个post请求,得到服务端返回的pone以及error

1
2
3
4
5
6
7
8
9
10
11
12
13
14
15
16
17
18
19
20
package client

import (
"io"
"net/http"
"testing"
)
func Test_client(t *testing.T) {
resp, err := http.Post("http://localhost:8080/ping", "", nil)
if err != nil {
t.Error(err)
return
}

body, _ :=io.ReadAll(resp.Body)
defer resp.Body.Close()

t.Log(string(body))
t.Error("test failed")
}

服务端

Server

整个HTTP服务端模块被封装在Server类中,包括两个核心字段:

  • Addr string:服务端的地址

  • Handler Handler:路由处理器

    它的类型是一个Handler接口,其中定义了一个方法ServeHTTP,用于根据Http请求中的请求路径映射到对应的handler处理函数,对请求处理和响应

路由处理器用于处理客户端请求,根据请求参数中的路径映射到对应的处理方法,再调用对应方法并返回结果

ServerMux

对Handler的具体实现,内部维护了一个map用于映射从path到对应处理方法的关系

1
2
3
4
5
6
type serveMux121 struct {
mu sync.RWMutex
m map[string]muxEntry
es []muxEntry // slice of entries sorted from longest to shortest.
hosts bool // whether any patterns contain hostnames
}
  • 通过一把读写锁保证并发安全性
  • 使用map建立映射,以请求路径为key,对应处理函数作为value
  • es是一个切片,用于前置匹配

其中muxEntry是一个handler单元,包含了path和处理函数handler两部分,它冗余了一个path,将key和value都保存了下来,同样使用了Handler接口,也需要请求和响应的使用

1
2
3
4
type muxEntry struct {
h Handler
pattern string
}

Handler注册流程

方法链:http.handleFunc()作为入口方法调用,进而会调用ServerMux.handleFunc()和ServerMux.Handle()

http包下声明了一个单例var defaultServeMux ServeMux,当使用http.handleFunc()注册handler时,会使用该默认单例注册

1
2
3
4
5
6
func (mux *serveMux121) handleFunc(pattern string, handler func(ResponseWriter, *Request)) {
if handler == nil {
panic("http: nil handler")
}
mux.handle(pattern, HandlerFunc(handler))
}

HandleFunc函数接受路径和处理函数两个变量,并调用默认单例下的HandleFunc函数,该函数会将我们的处理函数handler转化为一个HandlerFunc类型,这个类型内部实现了Handler接口中需要的ServeHTTP方法,即调用函数自身,转换后会调用自己的mux.Handle()方法

接下来是Handle方法

1
2
3
4
5
6
7
8
9
10
11
12
13
14
15
func (mux *serveMux121) handle(pattern string, handler Handler) {
mux.mu.Lock()
defer mux.mu.Unlock()

// ...
e := muxEntry{h: handler, pattern: pattern}
mux.m[pattern] = e
if pattern[len(pattern)-1] == '/' {
mux.es = appendSorted(mux.es, e)
}

if pattern[0] != '/' {
mux.hosts = true
}
}
  • 通过读写锁保证并发安全性
  • handle函数将路径和处理函数组成一个键值对放入serveMux的map中
  • 若传入的请求路径以/结尾,HTTP服务端就会把它视作前置匹配的模式,将路径加入es切片中,并按照路径长度降序排列
  • 若不以/开头,说明这个路由模式是主机模式,需要匹配主机头和路径,而若以/开头,说明路由模式是路径模式,可以忽略主机名

服务端运行流程

主流程

流程图如下:
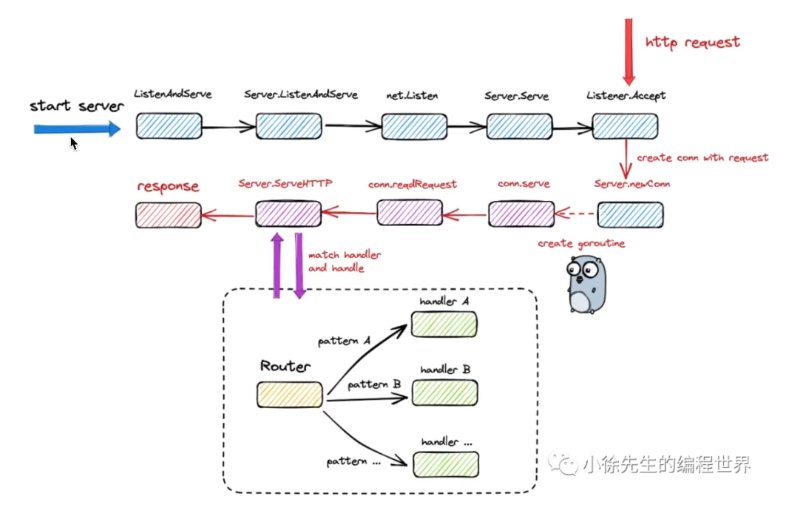
  • net.Listen()用于为当前端口申请一个监听器
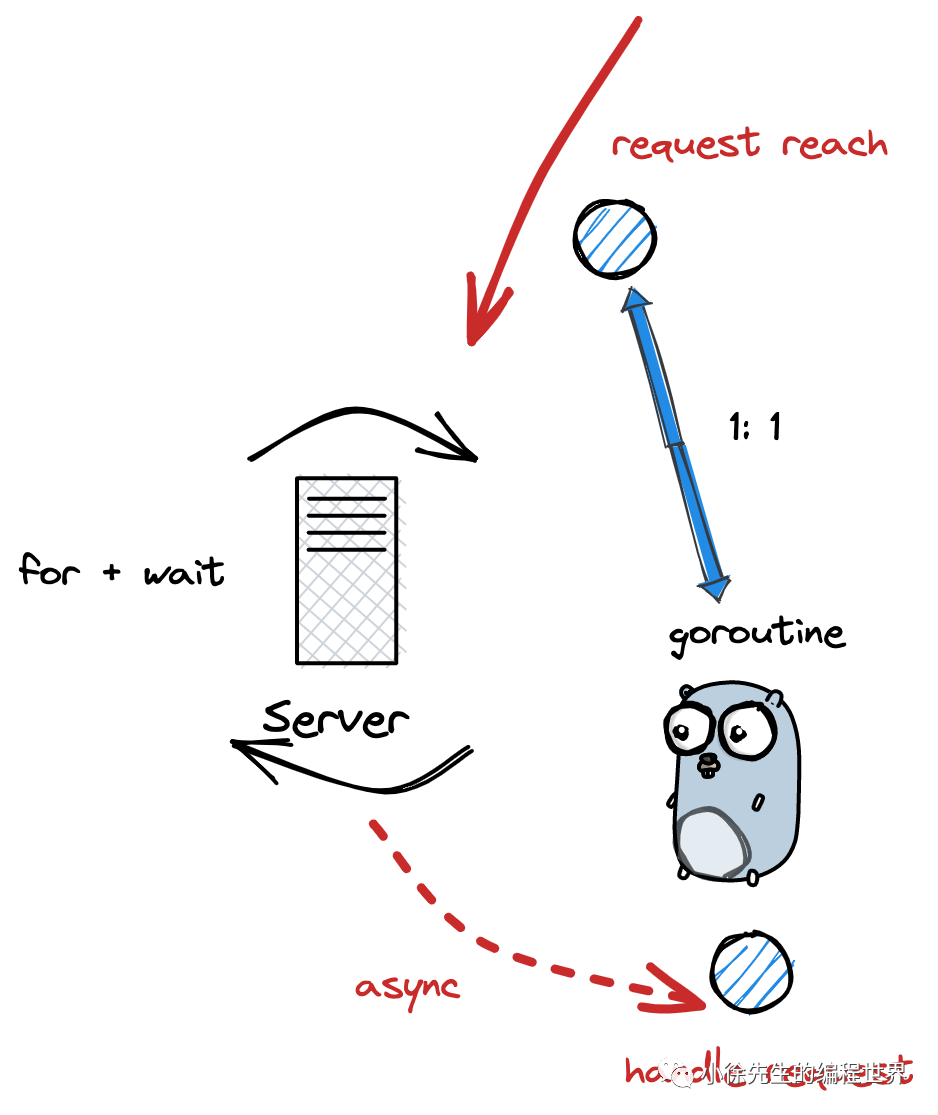
  • 服务端启动时会以for循环自旋方式运行,每次循环都会调用Listener.Accept()方法,保证持续监听端口时,若当前没有来自客户端的http请求,则当前服务端对应的goroutine会被动陷入阻塞,可以节省CPU,一旦有请求到来,服务端会被唤醒,执行接下来的流程
  • 针对到来的每一个请求都会构造一个connection结构体并启动一个goroutine来负责完成当前请求的处理,主方法继续循环监听
  • 接下来封装请求,到Server.ServeHTTP()方法时,会通过map匹配到对应处理函数处理,并输出响应
1
2
3
4
func ListenAndServe(addr string, handler Handler) error {
server := &Server{Addr: addr, Handler: handler}
return server.ListenAndServe()
}

ListenAndServe函数传入地址和handler,若handler为nil,会默认使用之前定义的default单例,传入后声明一个新的Server对象,并嵌套调用内部的方法

1
2
3
4
5
6
7
8
9
10
11
12
13
14
func (s *Server) ListenAndServe() error {
if s.shuttingDown() {
return ErrServerClosed
}
addr := s.Addr
if addr == "" {
addr = ":http"
}
ln, err := net.Listen("tcp", addr)
if err != nil {
return err
}
return s.Serve(ln)
}

该方法根据用户传入的端口,调用listen方法针对端口号分配一个端口监听器,并调用Serve方法

serve方法
Serve
1
2
3
4
5
6
7
8
9
10
11
12
13
14
15
16
17
18
19
20
21
22
23
24
25
26
27
28
29
30
31
32
33
34
35
36
37
func (s *Server) Serve(l net.Listener) error {
//...
ctx := context.WithValue(baseCtx, ServerContextKey, s)
for {
rw, err := l.Accept()
if err != nil {
if s.shuttingDown() {
return ErrServerClosed
}
if ne, ok := err.(net.Error); ok && ne.Temporary() {
if tempDelay == 0 {
tempDelay = 5 * time.Millisecond
} else {
tempDelay *= 2
}
if max := 1 * time.Second; tempDelay > max {
tempDelay = max
}
s.logf("http: Accept error: %v; retrying in %v", err, tempDelay)
time.Sleep(tempDelay)
continue
}
return err
}
connCtx := ctx
if cc := s.ConnContext; cc != nil {
connCtx = cc(connCtx, rw)
if connCtx == nil {
panic("ConnContext returned nil")
}
}
tempDelay = 0
c := s.newConn(rw)
c.setState(c.rwc, StateNew, runHooks) // before Serve can return
go c.serve(connCtx)
}
}

可以发现通过for循环轮询,每次调用Accept()方法,当有请求到来时,会通过newConn()封装一个结构体,并为新的请求调用conn.serve()方法调用一个goroutine,主循环继续监听

调用的这个方法是整个逻辑的主要方法,用来读取context中的请求,并传入serverHandler.ServeHTTP()来处理请求

1
2
3
4
5
6
7
8
func (sh serverHandler) ServeHTTP(rw Responsewriter,req *Request){
handler := sh.srv.Handler
if handler ==nil{
handler = DefaultServeMux
}
//..
handler.ServeHTTP(rw,req)
}

这里的serverHandler就是我们ListenAndServe时传入的参数,若handler为nil就会指定为default,进而调用路由中的ServeHTTP方法

这个方法有两步:

  • 通过request找到对应的handler
  • 执行handler的ServeHTTP方法

如何找到对应的handler呢?

1
2
3
4
5
6
7
8
9
10
11
12
13
14
15
16
func (mux *serveMux121) handler(host, path string) (h Handler, pattern string) {
mux.mu.RLock()
defer mux.mu.RUnlock()

// Host-specific pattern takes precedence over generic ones
if mux.hosts {
h, pattern = mux.match(host + path)
}
if h == nil {
h, pattern = mux.match(path)
}
if h == nil {
h, pattern = NotFoundHandler(), ""
}
return
}
  • 首先对应加一把读锁,防止并发问题
  • 根据hosts标记是否为真,选择路由模式,调用match函数
1
2
3
4
5
6
7
8
9
10
11
12
13
14
15
func (mux *serveMux121) match(path string) (h Handler, pattern string) {
// Check for exact match first.
v, ok := mux.m[path]
if ok {
return v.h, v.pattern
}
// Check for longest valid match. mux.es contains all patterns
// that end in / sorted from longest to shortest.
for _, e := range mux.es {
if strings.HasPrefix(path, e.pattern) {
return e.h, e.pattern
}
}
return nil, ""
}
  • 首先精准匹配,从map例直接找,找到了就返回
  • 若匹配不上,就按照最长公共前缀从长到短来匹配,若当前拿到的path是我们传入的请求路径的前缀,就返回该前缀对应的处理函数,响应请求

客户端

Client

client类对整个客户端模块封装

1
2
3
4
5
6
type Client struct {
Transport RoundTripper
CheckRedirect func(req *Request, via []*Request) error
Jar CookieJar
Timeout time.Duration
}
  • Transport:http通信核心部分
  • Jar:Cookie管理
  • Timeout:超时控制

其中Transport的类型是RoundTripper接口,里面定义了方法Roundtrip(),通过传入请求和服务端交互后产生响应Response

而Transport是实现类,核心字段:

1
2
3
4
5
6
type Transport struct {
idleConn map[connectMethodKey][]*persistConn
//...
DialContext func(ctx context.Context, network, addr string) (net.Conn, error)
//...
}
  • idleConn:空闲连接的map,可以实现复用
  • DialContext:新连接生成器,传入协议,目标地址等生成tcp连接

Request结构体用于封装请求数据

1
2
3
4
5
6
7
8
9
10
11
12
13
14
15
16
17
18
19
type Request struct {
// 方法
Method string
// 请求路径
URL *url.URL
// 请求头
Header Header
// 请求参数内容
Body io.ReadCloser
// 服务器主机
Host string
// query 请求参数
Form url. Values
// 响应参数 struct
Response *Response
// 请求链路的上下文
ctx context.Context
// ...
}

Response结构体用于封装响应数据

1
2
3
4
5
6
7
8
9
10
11
12
13
type Response struct {
// 请求状态,200 为 请求成功
StatusCode int // e.g. 200
// http 协议,如:HTTP/1.0
Proto string // e.g. "HTTP/1.0"
// 请求头
Header Header
// 响应参数内容
Body io.ReadCloser
// 指向请求参数
Request *Request
// ...
}

方法链路

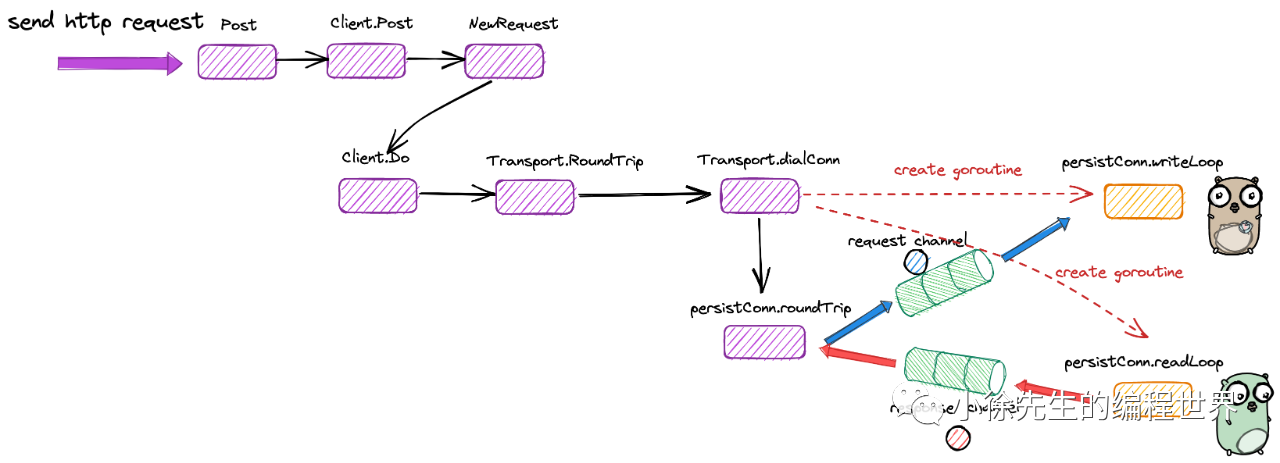
客户端发起一次http请求的步骤:

  • 构造http请求参数
  • 获取用于与服务端交互的tcp连接
  • 通过tcp连接发送请求参数
  • 通过tcp连接接受响应结果
Client

假设调用http.Post()发送一个post请求:

  • 首先构造request
  • 通过Transport模块的roudetrip构建tcp链接
  • 构建的connection分为两个goroutine:writeLoop和readLoop
  • 通过往request channel中塞入参数,writeLoop就会和服务端通信
  • 服务端返回的响应由readLoop接收,通过response channel传回接受方

为什么要使用channel和goroutine呢

请求流程

传入请求

http.Post()方法需要传入服务端url,请求参数格式和请求参数的io reader,它会使用包中的单例客户端DefaultClient处理请求,方法中调用了Defaultclient.Post()方法

1
2
3
4
5
6
7
8
func (c *Client) Post(url, contentType string, body io.Reader) (resp *Response, err error) {
req, err := NewRequest("POST", url, body)
if err != nil {
return nil, err
}
req.Header.Set("Content-Type", contentType)
return c.Do(req)
}

将方法,url,请求体通过NewRequest()方法构造出完整的请求参数,设置Header,再传入client.Do()方法处理

获得响应

client.Do()方法通过调用client.send()方法设置cookie,发送请求并更新response的cookie

1
2
3
4
5
6
7
8
9
10
11
12
13
14
15
16
17
18
19
20
21
22
func (c *Client) send(req *Request, deadline time.Time) (resp *Response, didTimeout func() bool, err error) {
cookieURL := req.URL
if req.Host != "" {
cookieURL = cloneURL(cookieURL)
cookieURL.Host = req.Host
}
if c.Jar != nil {
for _, cookie := range c.Jar.Cookies(cookieURL) {
req.AddCookie(cookie)
}
}
resp, didTimeout, err = send(req, c.transport(), deadline)
if err != nil {
return nil, didTimeout, err
}
if c.Jar != nil {
if rc := resp.Cookies(); len(rc) > 0 {
c.Jar.SetCookies(cookieURL, rc)
}
}
return resp, nil, nil
}

发送请求使用send函数,传入请求参数和通信模块,默认transport类

1
2
3
4
5
6
func send(ireq *Request, rt RoundTripper, deadline time.Time) (resp *Response, didTimeout func() bool, err error) {
// ...
resp, err = rt.RoundTrip(req)
// ...
return resp, nil, nil
}

send函数使用RoundTrip方法

1
2
3
4
5
6
7
8
9
10
func (t *Transport) roundTrip(req *Request) (_ *Response, err error) {
// ...
for {
treq := &transportRequest{Request: req, trace: trace, ctx: ctx, cancel: cancel}
// ...
pconn, err := t.getConn(treq, cm)
// ...
resp, err = pconn.roundTrip(treq)
}
}
  • 该方法首先将传入参数格式转换为transport格式
  • 接下来从transport模块获取一个可用的tcp链接,再用该链接的roundTrip方法获得响应

获取tcp链接

1
2
3
4
5
6
7
8
9
10
11
12
13
14
15
16
17
18
19
20
21
22
23
24
25
26
27
28
29
30
31
32
func (t *Transport) getConn(treq *transportRequest, cm connectMethod) (pc *persistConn, err error) {
// 获取连接的请求参数体
w := &wantConn{
cm: cm,
// key 由 http 协议、服务端地址等信息组成
key: cm.key(),
ctx: ctx,
// 标识连接构造成功的信号发射器
ready: make(chan struct{}, 1),
}
// 倘若连接获取失败,在 wantConn.cancel 方法中,会尝试将 tcp 连接放回队列中以供后续复用
defer func() {
if err != nil {
w.cancel(t, err)
}
}()
// 尝试复用指向相同服务端地址的空闲连接
if delivered := t.queueForIdleConn(w); delivered {
pc := w.pc
// ...
return pc, nil
}
// 异步构造新的连接
t.queueForDial(w)
select {
// 通过阻塞等待信号的方式,等待连接获取完成
case <-w.ready:
// ...
return w.pc, w.err
// ...
}
}
  • 通过传入的HTTP协议等信息构建一个key,去之前构建的idle池中映射,尝试复用指向相同服务端地址的空闲链接,若可以则直接返回

  • 若无法复用,就直接异步构造新的连接,主程序暂时阻塞,等待连接构造完毕后返回

  • 使用queueForIdleConn()尝试复用连接

    1
    2
    3
    4
    5
    6
    7
    8
    9
    10
    11
    12
    13
    14
    15
    16
    17
    18
    19
    20
    21
    22
    func (t *Transport) queueForIdleConn(w *wantConn) (delivered bool) {
    // ...
    if list, ok := t.idleConn[w.key]; ok {
    // ...
    for len(list) > 0 && !stop {
    pconn := list[len(list)-1]
    // ...
    delivered = w.tryDeliver(pconn, nil)
    if delivered {
    // ...
    list = list[:len(list)-1]
    }
    stop = true
    }
    // ...
    if stop {
    return delivered
    }
    }
    // ...
    return false
    }

    从对应的key找符合的连接,若能符合的连接大约等于一个,就找最后一个返回,若没有就只能创造新的连接

    1
    2
    3
    4
    5
    6
    7
    8
    9
    10
    11
    12
    func (t *Transport) queueForDial(w *wantConn) {
    // ...
    go t.dialConnFor(w)
    // ...
    }

    func (t *Transport) dialConnFor(w *wantConn) {
    // ...
    pc, err := t.dialConn(w.ctx, w.cm)
    delivered := w.tryDeliver(pc, err)
    // ...
    }

    queueForDial会异步调用dialConnFor函数,创建新的tcp连接

    因为tcp连接是有生命周期的,所以我们需要创建两个读写的守护进程

    • dialConn用于创建tcp连接
    • tryDeliver用于将连接绑定到wantConn上
    • 最后通过关闭ready channel操作唤醒上游读channel的goroutine
1
2
3
4
5
6
7
8
9
10
11
12
13
14
15
func (t *Transport) dialConn(ctx context.Context, cm connectMethod) (pconn *persistConn, err error) {
pconn = &persistConn{
t: t,
reqch: make(chan requestAndChan, 1),
writech: make(chan writeRequest, 1),
// ...
}
conn, err := t.dial(ctx, "tcp", cm.addr())
// ...
pconn.conn = conn
// ...
go pconn.readLoop()
go pconn.writeLoop()
return pconn, nil
}

writech由writeLoop持有,readch同理,当客户端想要发送请求后,使用writeLoop写入服务端,使用reqch接收来自服务端的信息到channel

1
2
3
4
5
6
7
8
9
10
11
12
13
14
15
16
17
18
19
20
21
22
23
24
25
26
27
28
 func (pc *persistConn) readLoop() { 
// ...
alive := true
for alive {
// ...
rc := <-pc.reqch
// ...
var resp *Response
// ...
resp, err = pc.readResponse(rc, trace)
// ...
select{
rc.ch <- responseAndError{res: resp}:
// ...
}
// ...
}
}

func (pc *persistConn) writeLoop() {
for {
select {
case wr := <-pc.writech:
// ...
err := wr.req.Request.write(pc.bw, pc.isProxy, wr.req.extra, pc.waitForContinue(wr.continueCh))
// ...
}
}
  • readLoop接收到reqch后判断发生新一轮请求,和服务端建立通讯并读取响应,通过内置的channel接收来自服务的响应
  • writeLoop拿到客户端提交的请求后,将其发送到服务端

主干链路

1
2
3
4
5
6
7
8
9
10
11
12
13
14
15
16
17
18
19
20
21
func (pc *persistConn) roundTrip(req *transportRequest) (resp *Response, err error) {
// ...
pc.writech <- writeRequest{req, writeErrCh, continueCh}
resc := make(chan responseAndError)
pc.reqch <- requestAndChan{
req: req.Request,
cancelKey: req.cancelKey,
ch: resc,
// ...
}
// ...
for {
select {
// ...
case re := <-resc:
// ...
return re.res, nil
// ...
}
}
}
  • 该函数是和两个Loop通讯的主要函数
  • 将我们的请求塞入writech,使得writeLoop接收,并把请求放入服务端,并构造好接收响应的channel,塞入requestAndChan中,这样就可以被readLoop接收到
  • 后续使用for循环持续监听,当readLoop接收到了结果,就会被主流程接收到,进行处理

赞助喵
非常感谢您的喜欢!
赞助喵